 Save
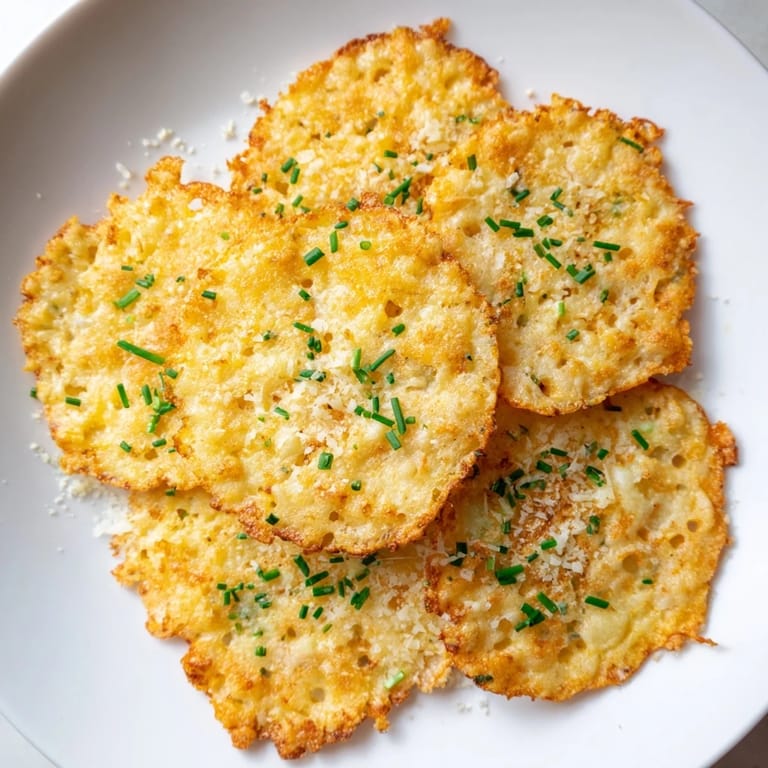
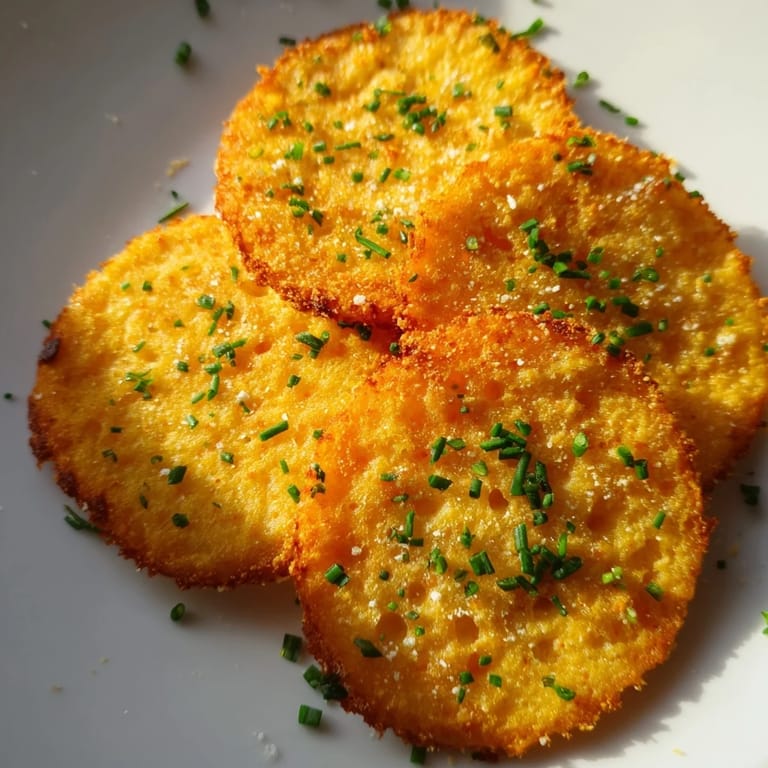
Save I discovered cottage cheese chips by accident one afternoon when I was cleaning out my fridge and found a container of cottage cheese I'd bought with vague intentions. Instead of letting it go to waste, I decided to drain it and season it, then baked it out of pure curiosity. Twenty minutes later, the smell of toasted garlic and paprika filled my kitchen, and when I pulled the tray out, I couldn't believe these crispy, savory discs had come from something so humble. It became my new go-to snack almost immediately.
I brought a batch to a book club meeting once, and everyone assumed I'd bought them from some fancy snack company. When I admitted they were made from cottage cheese, the skepticism on their faces was priceless—until they tasted one. By the end of the night, I was writing down the recipe on napkins, and now two friends make them regularly for their own get-togethers.
Ingredients
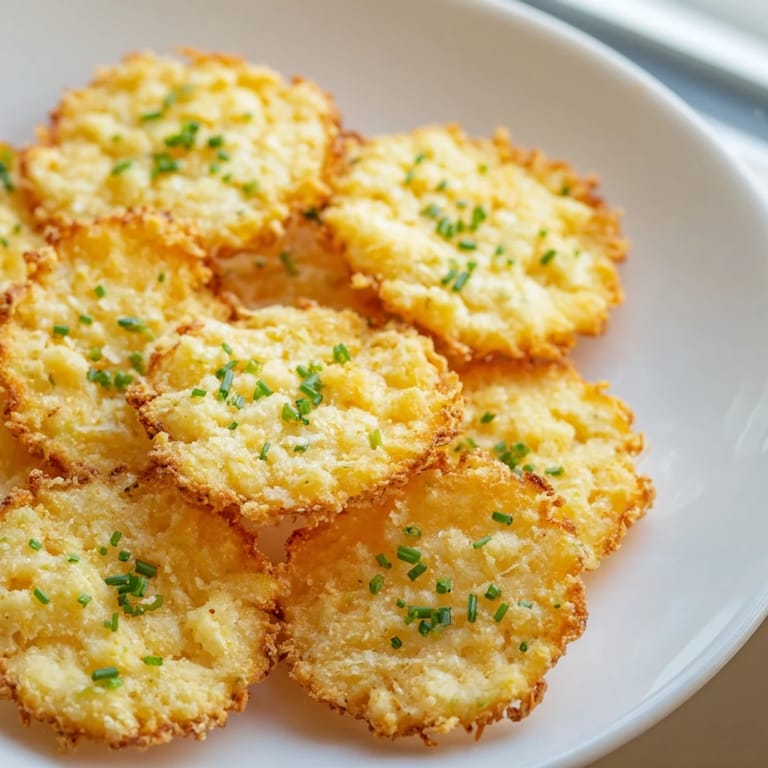
- Cottage cheese: Full-fat or low-fat both work, but small curd makes a better texture since it breaks up more evenly when you mix and flatten it.
- Garlic powder: This is your backbone flavor—don't skip it or use fresh garlic, which releases moisture and ruins the crispiness.
- Onion powder: Works with the garlic to build savory depth without adding any liquid that could make the chips soggy.
- Smoked paprika: Optional but worth it; it adds color and a subtle warmth that makes people ask what the secret is.
- Black pepper: Freshly ground matters here because pre-ground loses its punch while these bake.
- Salt: Taste as you mix and adjust—you want just enough to make people reach for another chip.
- Chives and Parmesan: These optional toppings are your chance to customize; sprinkle them on before baking for best adhesion.
Tired of Takeout? 🥡
Get 10 meals you can make faster than delivery arrives. Seriously.
One email. No spam. Unsubscribe anytime.
Instructions
- Set your oven and prep your pan:
- Preheat to 350°F and line your baking sheet with parchment paper or a silicone mat—this prevents sticking and makes cleanup painless. This temperature is low enough that the chips dry out and crisp instead of browning too fast.
- Drain the cottage cheese thoroughly:
- Pour it into a fine-mesh sieve and let gravity do some work, then press gently with the back of a spoon to squeeze out more liquid. Finish with a few pats of paper towels; dryness here is the whole secret to crispiness.
- Season and mix:
- Combine your drained cheese with all the seasonings in a bowl and mix until everything is distributed evenly. The mixture should taste slightly more seasoned than you think it should, because baking mellows flavors.
- Spoon and flatten:
- Use a tablespoon to create mounds about 2 inches apart, then gently press each one with the back of the spoon to flatten them into thin circles. They should be roughly the thickness of a potato chip, or slightly thicker—this determines whether they'll be crispy or chewy.
- Top if you want:
- Sprinkle with chives or Parmesan now while the mixture is still slightly sticky, so they stay put during baking.
- Bake until golden:
- Slide into the oven for 30 to 35 minutes, keeping an eye on them after the 25-minute mark so they don't brown too dark. They're done when the edges look golden and slightly darker, and the centers feel set when you touch them lightly.
- Cool completely before serving:
- Leave them on the baking sheet to cool all the way down; this is when they'll harden into that satisfying crunch you're after. They'll continue to crisp up even after you think they're done.
 Save
Save The moment these chips became more than just a snack for me was when my neighbor came over, tried one, and immediately started asking about making them for his kids' school lunches. He was convinced they'd be a hit, and watching someone get excited about food you made in your own kitchen is a different kind of satisfaction than eating alone.
Storage and Keeping
These chips stay crispy for about two days in an airtight container, though they'll gradually soften as they absorb moisture from the air. If you make them ahead for a party, store them in a sealed container with a silica packet or piece of parchment between layers, and only pull them out 20 minutes before serving. If they do soften, a few minutes in a 300°F oven will re-crisp them, though the flavor won't be quite as fresh.
Flavor Variations to Try
Once you've made these once, you'll start seeing all the ways you can play with them. I've had success adding chili flakes for heat, dried dill for an herbaceous turn, everything bagel seasoning for nostalgia, and even a tiny pinch of cinnamon mixed with a touch of sugar for a slightly sweet version that nobody expects. The base recipe is forgiving; just remember that any fresh ingredients need to be dried first, and wet additions like hot sauce should be used sparingly.
Serving Ideas and Pairings
These are excellent on their own as a snack, but they shine even brighter with something to dip them into. Greek yogurt mixed with a little lemon juice and dill becomes a creamy dip that feels fancier than it is, salsa adds brightness and a little heat, and guacamole turns them into something almost like nachos. I've also served them alongside soup as a crunchy textural contrast, and they pair wonderfully with a simple cheese board if you're looking to add something savory and unexpected.
- Try them with a smoked salmon and cream cheese dip for a weekend brunch moment.
- Pair them with roasted red pepper hummus to add color and creaminess to your snack plate.
- Remember they're naturally high in protein, so they actually satisfy hunger instead of just being empty calories.
 Save
Save These chips remind me why I love cooking with simple, inexpensive ingredients—there's something magical about turning something as ordinary as cottage cheese into something crunchy and crave-worthy. Once you taste them, you'll understand why I can't stop making them.
Recipe FAQs
- → How do I ensure the chips become crispy?
Drain cottage cheese thoroughly using a fine-mesh sieve and pat dry to remove excess moisture before baking. Baking until golden brown also helps achieve crispiness.
- → Can I add other seasonings to these chips?
Yes, spices like chili flakes or dried herbs can be incorporated to customize the flavor profile according to preference.
- → What is the best way to bake these chips evenly?
Space the cottage cheese mounds about 2 inches apart on a lined baking sheet and flatten them to create thin, uniform circles for even baking.
- → Are these chips suitable for gluten-free diets?
Yes, these baked cottage cheese chips contain no gluten ingredients and are naturally gluten-free.
- → How can I store leftover chips?
Store cooled chips in an airtight container for up to two days to maintain their crisp texture.