 Save
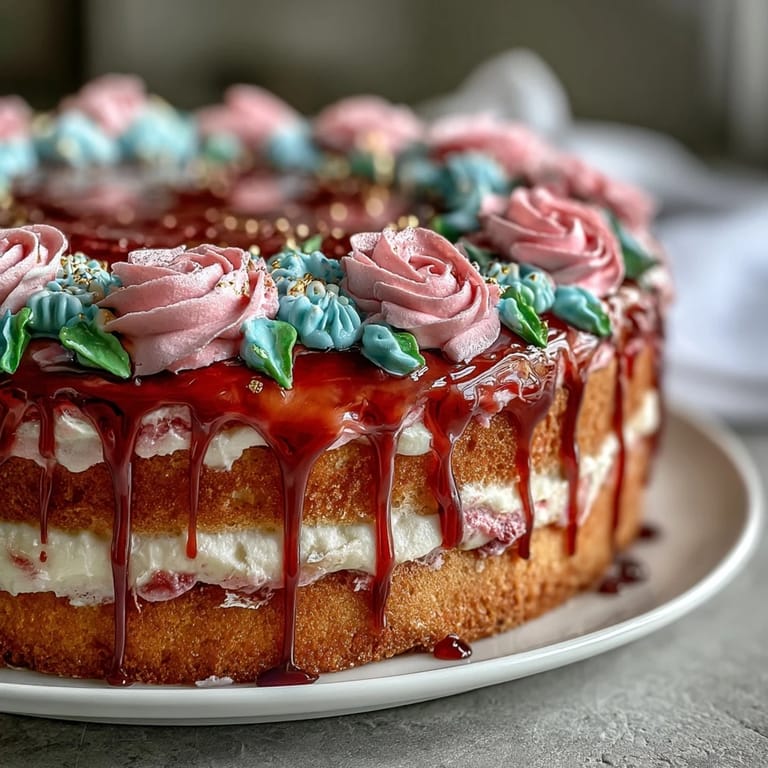
Save My friend Sarah called me three weeks before her graduation, voice trembling with that mix of excitement and overwhelm only a Taurus can pull off. She wanted a cake that felt like her—steady, beautiful, something that wouldn't wilt under pressure. I'd been experimenting with layered vanilla cakes that spring, and the idea of pairing them with hand-piped florals felt right, like we could build something that celebrated both her stubbornness and her grace.
The night before Sarah's party, my kitchen smelled like butter and vanilla while I fitted piping bags with petal tips. She stopped by to help, and we laughed about how the purple buttercream looked like bruises at first, then suddenly bloomed into tiny lilacs across a practice board. That's when it clicked—this cake wasn't just dessert, it was a conversation between us about what's worth celebrating.
Ingredients
- All-purpose flour (2 1/2 cups): The foundation that keeps the cake tender without being fragile, sifted because lumps hide and ruin the crumb.
- Baking powder (2 1/2 tsp): This is what gives you those three moist layers without them becoming dense or rubbery.
- Salt (1/2 tsp): Don't skip it—salt amplifies the vanilla and keeps the sweetness from tasting one-dimensional.
- Unsalted butter (1 cup for cake, 1 1/2 cups for frosting): Room temperature is non-negotiable, or you'll spend forever beating and still won't get that fluffy texture.
- Granulated sugar (2 cups): Creamed with butter until pale, which takes longer than you think but makes all the difference in structure.
- Eggs (4 large, room temperature): Cold eggs seize up the batter—leave them out an hour before you start.
- Pure vanilla extract (1 tbsp for cake, 2 tsp for frosting): The good stuff, always, because it's the personality of this cake.
- Whole milk (1 cup, room temperature): Alternating with flour keeps gluten development gentle and the cake tender.
- Powdered sugar (5 cups, sifted): Lumps in buttercream catch on the piping tip and ruin your florals before you start.
- Heavy cream or milk (2-4 tbsp for frosting): Adjusts the consistency so your piping isn't fighting you—start with less, add more if needed.
- Gel food coloring: Better color saturation than liquid, and won't thin your buttercream into weeping disaster.
- Edible gold leaf or sprinkles (optional): For that Taurus stubbornness and the shine of accomplishment.
Tired of Takeout? 🥡
Get 10 meals you can make faster than delivery arrives. Seriously.
One email. No spam. Unsubscribe anytime.
Instructions
- Prep your pans like your life depends on it:
- Preheat to 350°F, grease three 8-inch rounds, line with parchment, then grease again—nobody wants stuck cake edges. I learned this the hard way the first time I attempted layers.
- Whisk the dry team together:
- Flour, baking powder, salt go into a bowl, and you whisk like you mean it to aerate and combine evenly. This prevents dense spots.
- Beat butter and sugar until it looks like pale sand:
- This takes 3-4 minutes on medium speed and is where the air pockets live that make your cake fluffy. Don't rush this step—it's meditation and chemistry.
- Add eggs one at a time, beating between each:
- This prevents the batter from breaking and ensures even incorporation. Each egg should disappear into the butter before the next one arrives.
- Mix in vanilla, then alternate flour and milk:
- Start with flour, then milk, then flour again, ending with flour—this technique keeps gluten development minimal and the crumb delicate. Mix until just combined, not until you see a smooth batter.
- Divide and bake evenly:
- Distribute batter equally among the three pans, smooth the tops, and bake 28-35 minutes until a toothpick comes out clean. The smell will drive you insane with waiting.
- Cool with patience, not shortcuts:
- Ten minutes in the pan, then transfer to racks completely. Warm cake crumbles; rushing this creates frustration.
- Beat buttercream until it's fluffy clouds:
- Creamy butter, gradually add sifted powdered sugar, then vanilla and cream. Beat for 3-4 minutes until it's light and spreadable, not dense.
- Tint your buttercream strategically:
- Divide into bowls, add gel coloring drop by drop—it's more potent than you expect. Mix until even, and let the colors deepen slightly as they sit.
- Build the cake with a crumb coat first:
- Place first layer, spread buttercream, repeat, then apply a thin coat everywhere and chill 20 minutes. This catches crumbs so your final coat stays pristine.
- Apply the final smooth coat:
- This is where the cake looks intentional and elegant. Use an offset spatula and patience, smoothing as you turn the cake on a turntable if you have one.
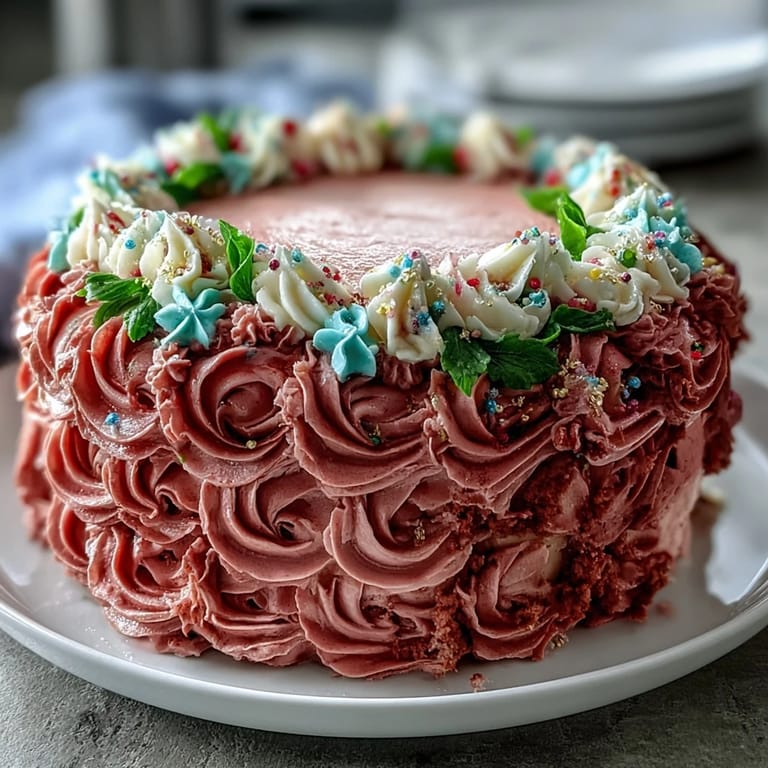
- Pipe florals like you're telling a story:
- Use colored buttercream and petal tips for flowers, leaf tips for greenery, round tips for accents. Start with practice strokes on parchment, then move to the cake with confidence.
- Add gold for that Taurus moment:
- Edible gold leaf or sprinkles catch light and make the cake feel celebratory and intentional.
 Save
Save Sarah cried when she saw the finished cake, which made me cry, which made her mom take about fifty photos. It wasn't just about the florals or the layers—it was about showing up for someone with intention, with butter and sugar and time spent learning how things should be.
Why This Cake Matters for a Graduation Moment
Graduations feel abstract until you're holding something tangible, and a homemade cake does that in a way nothing else can. This isn't a store cake—it's proof that someone spent hours thinking about how to make something beautiful just for this person, on this day.
The Taurus Connection
Taurus energy is all about steadiness, loyalty, and beauty that lasts. A classic vanilla cake with hand-piped florals speaks that language—it's not trendy or fleeting, it's grounded and gorgeous. The gold accents nod to their symbol and their stubbornness in a way that feels celebratory, not cheesy.
Making This Cake Your Own
The bones of this recipe are flexible—you can bake the layers the day before, store them wrapped at room temperature, then frost and decorate the morning of the party. The floral piping is where you inject personality, whether that's delicate peonies or bold roses. Start on parchment paper if you're nervous, then transfer designs to the cake once you trust your hand.
- Match buttercream colors to the graduate's school colors or birth flower for a personalized touch that feels intentional.
- If your kitchen is warm, chill the piping bags between designs so the buttercream stays firm enough to hold its shape.
- Keep the finished cake in a cool place until serving—buttercream softens quickly but also firms up well when chilled.
 Save
Save This cake tastes like vanilla should taste—rich without being heavy, sweet without being cloying. Serve it at room temperature with sparkling wine or floral tea, and watch people slow down to actually taste it.
Recipe FAQs
- → What flavor is the cake?
The cake has a classic vanilla flavor, achieved through pure vanilla extract and balanced with creamy butter and milk for moistness.
- → How do I create the floral buttercream designs?
Tint buttercream with gel colors in shades like pink, green, and purple, then use various piping tips such as petal and leaf tips to pipe detailed floral patterns.
- → Can I customize the decorations for different occasions?
Yes, you can replace the Taurus symbols with other accents like graduation caps, or match colors to birth months or school themes.
- → Is there an option to enhance the cake flavor?
Adding almond extract to the batter adds a subtle nutty flavor that complements the vanilla layers.
- → What tools are recommended for decorating?
Use an electric mixer, piping bags with assorted floral tips, an offset spatula, and optionally a cake turntable for smooth and detailed decoration.
- → How long should the cake cool before decorating?
Allow cakes to cool completely on wire racks, about 1 hour, and chill the crumb-coated cake for 20 minutes before final frosting.